Coco Coir for Houseplants — The Modern Soil Amendment Replacing Peat Moss
If you've been using peat-based mixes, coco coir is the upgrade you didn't know you needed.
Why Coco Coir Is Replacing Peat Moss (And Why That Matters)
Here's a fun fact: the coconut industry produces millions of tons of coir every year — the fiber stripped from coconut husks after the husk is processed for food. Most of it gets incinerated or dumped. Meanwhile, peat moss — which takes centuries to form in fragile bog ecosystems — gets dug up and packed into every third bag of potting mix at the garden center.
That's the sustainability story in a nutshell: coco coir is essentially a waste product getting a second life. Peat is a finite resource being strip-mined from ecosystems that take forever to recover.
Coco coir does everything peat does, and in most cases does it better. It holds water without becoming anaerobic. It aerates soil. It has a neutral pH (5.5–6.5, right in the sweet spot for most houseplants). It rewets easily if it dries out — unlike peat, which can become hydrophobic and repel water for weeks.
The only catch? Coco coir is basically inert. It has almost no nutrients of its own. And because of how it's structured at a chemical level, it tends to tie up calcium and magnesium, which means your plants can show deficiency symptoms even if you're fertilizing regularly. We'll get into the fix for that — it's easy — but it's the part most "just add coir to your soil" articles gloss over.
What Is Coco Coir? (The Short Version)
Coco coir comes from the fibrous layer between the outer coconut husk and the inner shell. After the husk is processed for food-grade use, the remaining fiber material is what becomes coco coir — coco peat, coco chips, and coco fiber, depending on how it's processed.
Brown coir comes from fully mature coconuts and is courser, more rigid — used for brushes and doormats historically.
White coir comes from immature green coconuts and is lighter, more flexible — used for rope and fishing nets.
For horticulture, you're dealing with brown coir, which gets processed into three usable forms:
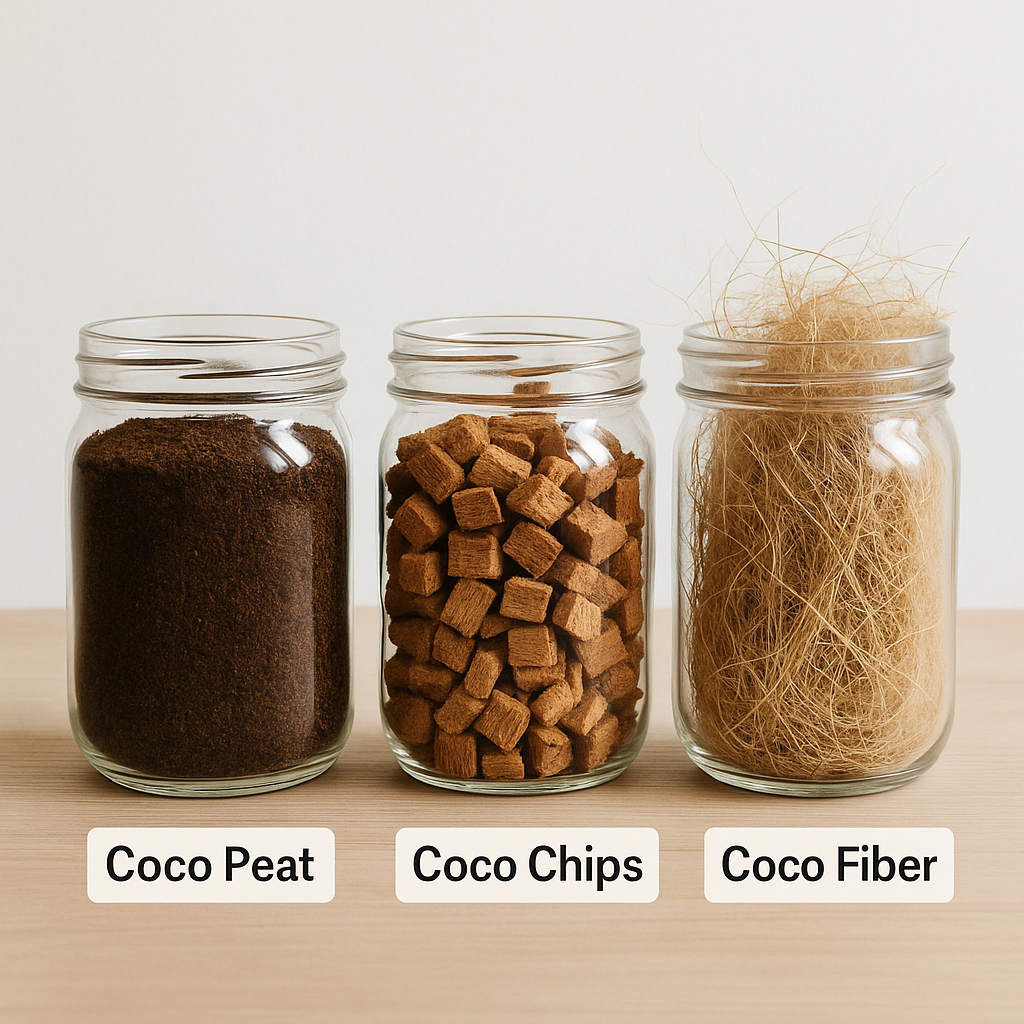
- Coco peat (also called coco dust): The fine, soil-like material left after the long fibers are removed. This is what most people mean when they say "coco coir." High water retention, great for seed starting and moisture-loving plants.
- Coco chips (also called coco croutons): Small chunky pieces that add aeration and drainage. Think of them as lightweight expanded clay pebbles, but from coconut.
- Coco fiber: Long, stringy strands that add structure and some water retention but don't break down as fast as peat.
For most houseplant use, you'll use coco peat as your base and add coco chips and/or perlite for drainage. Pure coco peat alone can compact and hold too much water.
Coco Coir vs Peat Moss: The Honest Comparison
| Coco Coir | Peat Moss | |
|---|---|---|
| Sustainability | Renewable waste product | Non-renewable, strip-mined from bogs |
| pH | Neutral (5.5–6.5) | Acidic (3.5–4.5) — lowers soil pH over time |
| Water retention | Excellent, but drains freely | Excellent but can become waterlogged |
| Rewetting if dry | Easy — absorbs water quickly | Difficult — becomes hydrophobic |
| Nutrient content | Virtually none (inert) | Virtually none (inert) |
| Longevity | 2-3 years before breaking down | 1-2 years, breaks down faster |
| Salt content | Can be high — needs rinsing/buffering | Low |
| Cost | Comparable or slightly higher | Slightly cheaper |
| Availability | Widely available online and in stores | Ubiquitous at any garden center |
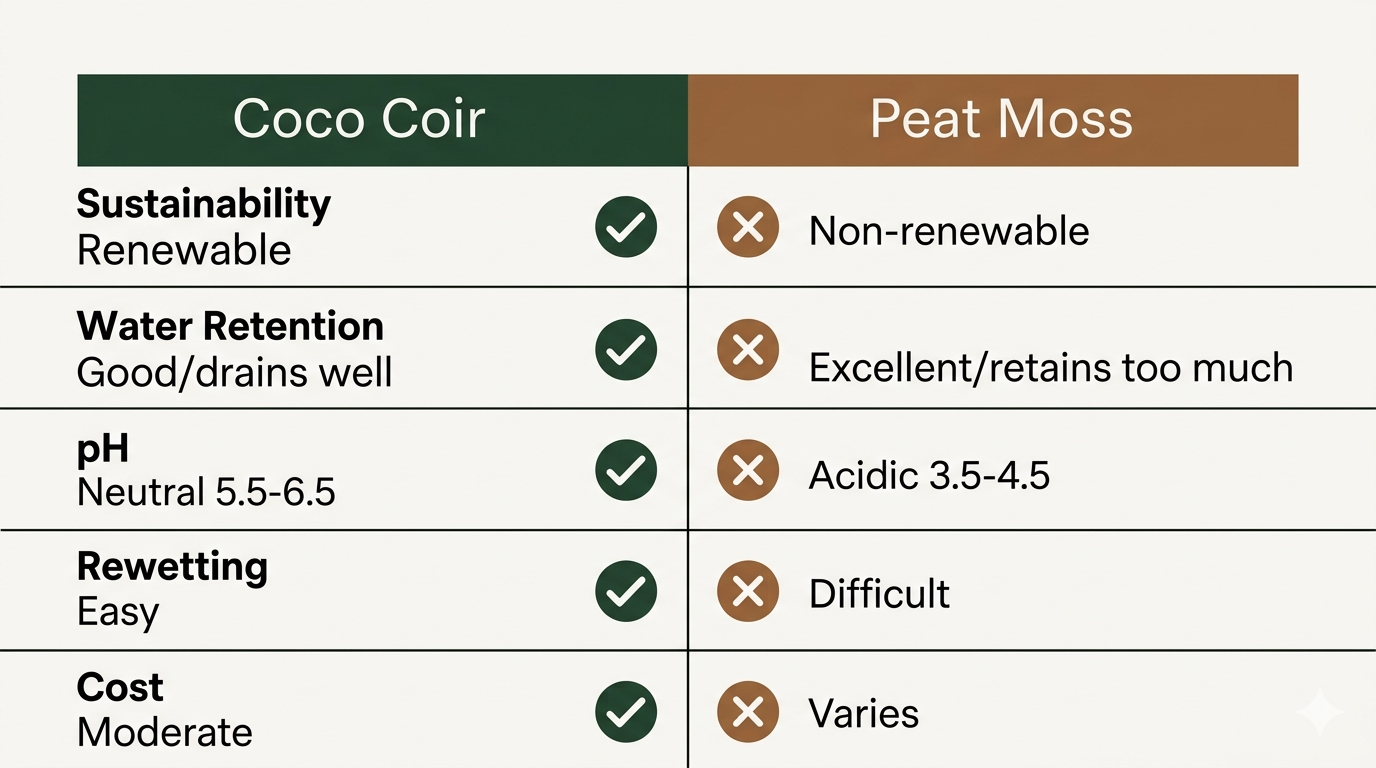
The biggest practical advantages of coco coir over peat for houseplants: it doesn't acidify your soil over time, and it rewets easily. Peat moss gradually lowers pH, which changes nutrient availability — something you may not notice until your plant starts looking off. Coco coir's neutral pH means your soil stays more stable.
The biggest practical advantage of peat: it's in every garden center. Coco coir usually requires an online order or a specialty store. If you need something today and your local store doesn't carry coir, peat will do in a pinch.
What Coco Coir Does (and Doesn't Do) for Your Plants
Coco coir is a soil amendment and a growing medium. It does three things well:
- Retains moisture — it holds water in the root zone without becoming waterlogged, giving roots access to both water and air
- Improves aeration — the chunkier forms (chips, fiber) create air pockets that roots love
- Provides a neutral pH foundation — unlike peat, it won't gradually acidify your mix
That's it. That's the list.
Coco coir does NOT provide nutrients. It's basically inert — think of it like a sponge. It holds water and nutrients and gives roots something to hold onto, but it doesn't feed your plant. This means you still need to fertilize regularly in a coco coir-based mix, and you need to pay attention to the cal-mag issue we mentioned (more on that below).
If you're coming from a standard peat-based potting mix, the experience is similar from a plant-parent perspective: coir is your structural base, and you still add fertilizer, still monitor for overwatering, still treat it like soil. The difference is in the details — better rewetting, more stable pH, better aeration when done right.
For more on what to feed your plants, check out our fertilizer guide — coco coir's inert nature means your fertilizing game needs to be on point.
How to Prepare Coco Coir: Bricks, Bales, and Loose
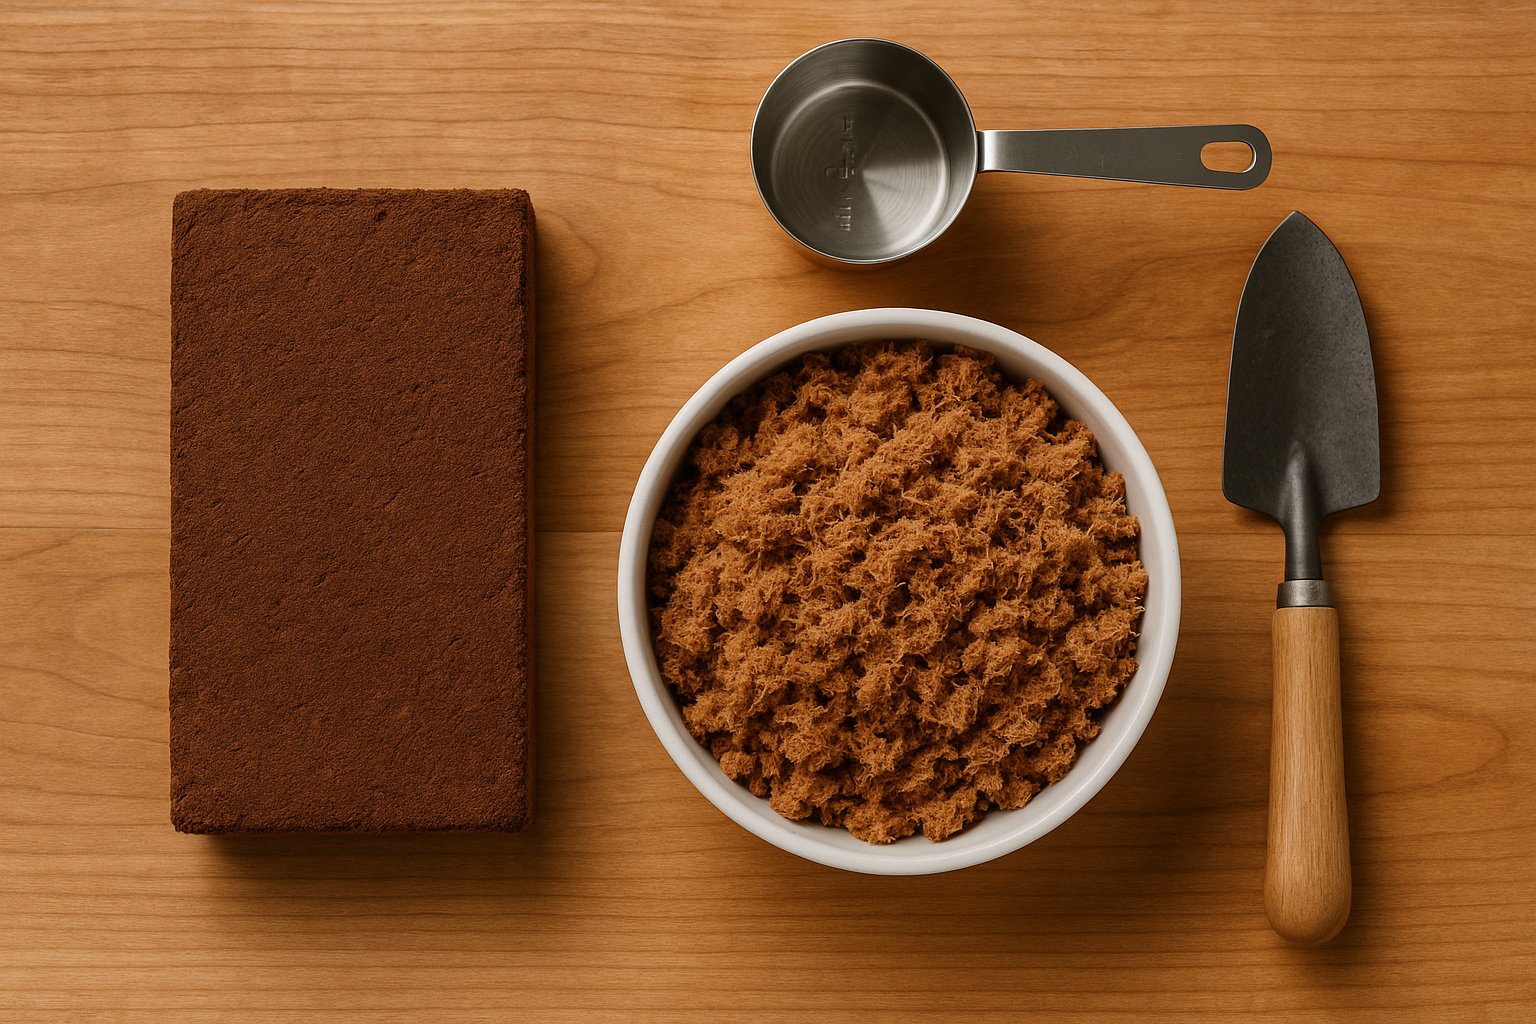
Here's the thing nobody tells you when you first try coco coir: it comes compressed. A brick that fits in your palm expands to fill a five-gallon bucket. If you don't know this going in, the first time you open a brick you'll feel like you bought something the size of a matchbox by mistake.
Coco coir comes in three forms:
- Compressed bricks — the most common and cheapest format. Hydrate in a bucket or tub.
- Loose, pre-hydrated coir — sold in bags, ready to use. More expensive but more convenient.
- Bagged coir mix — coir already blended with perlite and/or bark. A shortcut product.
For most houseplant parents, starting with bricks is the move. They're cheap, they store forever, and rehydrating them takes five minutes.
Plantonix Coco Bliss Coco Coir Brick on Amazon is a solid starting point — roughly $8 per brick, and one brick rehydrates into about 8-10 quarts of usable coir. That's a lot of potting mix base for eight dollars.
How to Rehydrate a Coco Coir Brick
Step 1: Get a big bucket. You'll need a 5-gallon bucket or a large storage tub. A brick expands roughly 5-7x its dry volume.
Step 2: Add water. Most bricks come with instructions on the package, but a standard 5kg brick (the most common size) needs about 15-20 liters (4-5 gallons) of water to fully hydrate. Add the brick to your empty bucket, pour in the water, and let it sit for 20-30 minutes.
Step 3: Break it up. After soaking, the coir should be fluffy and loose. Use your hands or a trowel to break up any clumps. If it's still dry in spots, add more water and work it through. It should feel like damp, loose soil — not soggy, not dusty.
Step 4: Check the salt. Lower-quality coir can have high residual salts from the processing (sea water exposure). If you're using a new brand, rinse the hydrated coir in fresh water before using it. Let it drain fully. High salt content shows up as brown tips and crispy edges on your plants, and it's a fixable problem — just don't skip the rinse step if your coir came from an unknown source.
One important note: if coco coir dries out completely — like, left-in-a-pot-over-the-summer dry — it becomes hydrophobic. Same as peat. It will repel water and be frustrating to rehydrate. If that happens, soak the dry coir for an hour, break it up, and let it saturate fully. For more on rescuing hydrophobic media, see our guide to fixing hydrophobic soil.
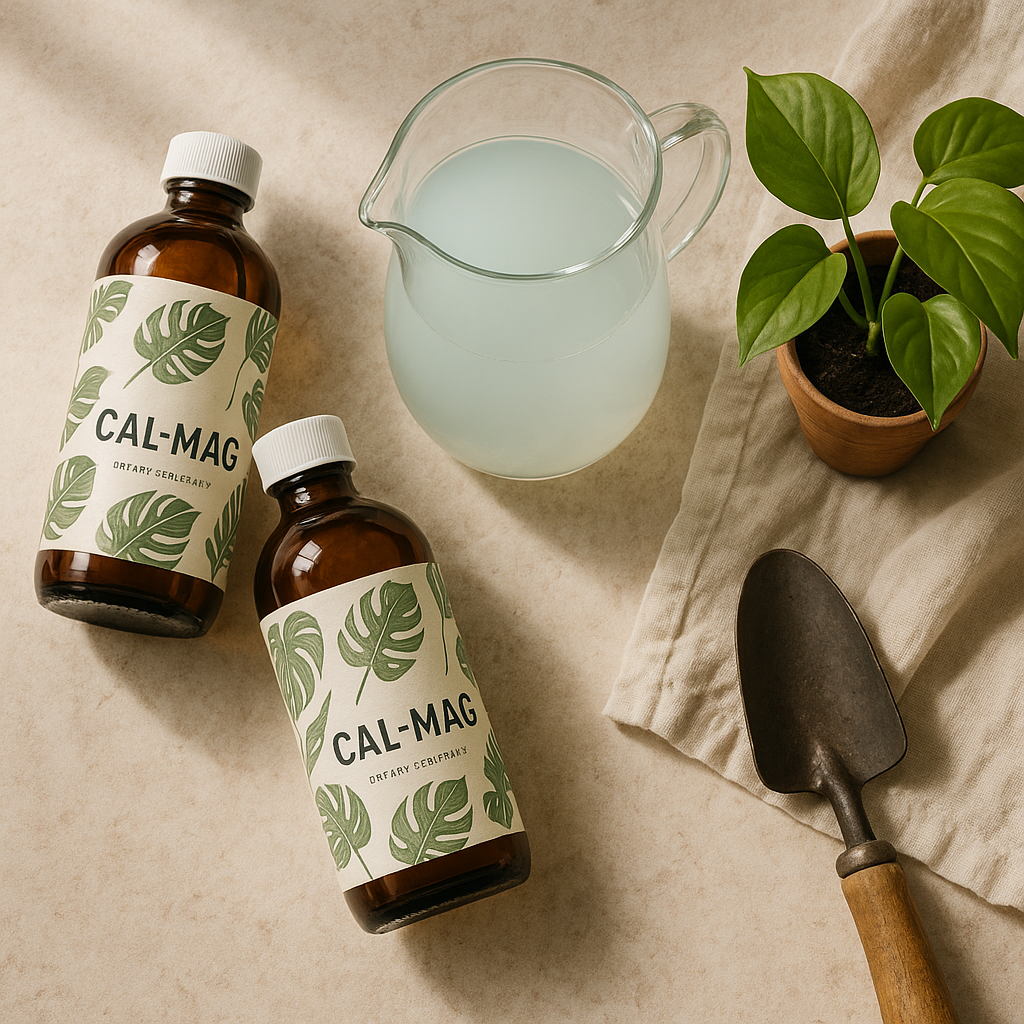
The Cal-Mag Thing: Why Coco Coir Needs Extra Love
This is the part most articles skip, and it's the reason some people's plants look worse after switching to coco coir. Pay attention.
Coco coir has a chemical property called cation exchange capacity (CEC). Without getting too deep into the chemistry: coir's fibers have negatively charged sites that hold onto positively charged nutrient ions — and calcium (Ca²⁺) and magnesium (Mg²⁺) ions happen to be two of the nutrients it holds onto most tightly.
What this means in practice: when you water with a standard fertilizer, the calcium and magnesium can get "stuck" on the coir fibers instead of reaching your plant's roots. Your plant shows cal-mag deficiency symptoms — brown spots on leaves, stunted new growth, leaf curling, pale or yellowing leaves — even though you're fertilizing.
This is a bigger problem with unbuffered coir. Buffered coir has already been treated to saturate those exchange sites with calcium and magnesium, so it doesn't tie up as much from your fertilizer. But many cheaper bricks are unbuffered.
The fix is straightforward: supplement with a cal-mag solution.
For most houseplants, adding a calcium-magnesium supplement to your watering routine (once every 2-4 weeks during active growth) is sufficient. Use something like Botanicare Cal-Mag Plus — roughly $15-20 and it lasts for months. You don't need cannabis-level dosing; a light supplemental dose is all most houseplants need.
Signs you need more cal-mag in your coco coir setup:
- Brown leaf tips and edges — often calcium deficiency
- New leaves coming in small or distorted — magnesium deficiency
- Pale new growth overall — could be either, or both
- Slowed growth even with good light and fertilizer — classic cal-mag lockout symptom
If you see these symptoms and you're growing in coco coir, cal-mag deficiency is a likely culprit. See our hydroponic nutrients guide for more on the nutrient side of things — a lot of the cal-mag wisdom translates directly.
Coco Coir Mix Recipes by Plant Type
Coco coir alone isn't a complete potting medium. It needs drainage partners — perlite for aeration, orchid bark for structure, sometimes grit or sand for extra drainage. Here's where most people go wrong: they add coir to their existing peat-based mix and call it done. A 50/50 peat-coir blend is better than pure peat, but it's not optimized.
The general houseplant formula: 50% coco coir + 25% orchid bark + 25% perlite
That's the starting point for most tropical houseplants. Adjust up or down based on your plant's specific needs.
The Three Things You Need
Before the recipes — what to actually buy. You're going to need:
- Coco coir (brick or loose — your call)
- Perlite — Espoma Perlite on Amazon is a standard, clean option
- Orchid bark — chunky orchid bark (not fine orchid bark) in the 1/2" to 3/4" size range works best. Orchid Bark on Amazon (Repotme is a solid brand) — a bag lasts forever since it's mostly used as a top dressing too
That's it. Three things. Our full DIY potting mix recipe goes deeper on this combination if you want the complete breakdown.
Coco Coir Types: Peat, Chips, and Fiber — What's the Difference?
Quick explainer so you're not confused when you see product listings:
- Coco peat (fine): The soil-like material. High water retention. Best for seed starting, propagation cubes, and plants that like consistent moisture (ferns, tropicals).
- Coco chips (chunky): The crouton-sized pieces. Lower water retention, better drainage and aeration. Good for aroids (Monstera, Philodendron) that want moisture but hate sitting in wet soil.
- Coco fiber (strands): Long fibers, moderate water retention, good structure. Adds bulk and some aeration. Often mixed with peat or chips rather than used alone.
For the recipes below, we're using coco peat as the base. If you have coco chips, you can substitute some or all of the peat for a chunkier mix.
Mix Recipes
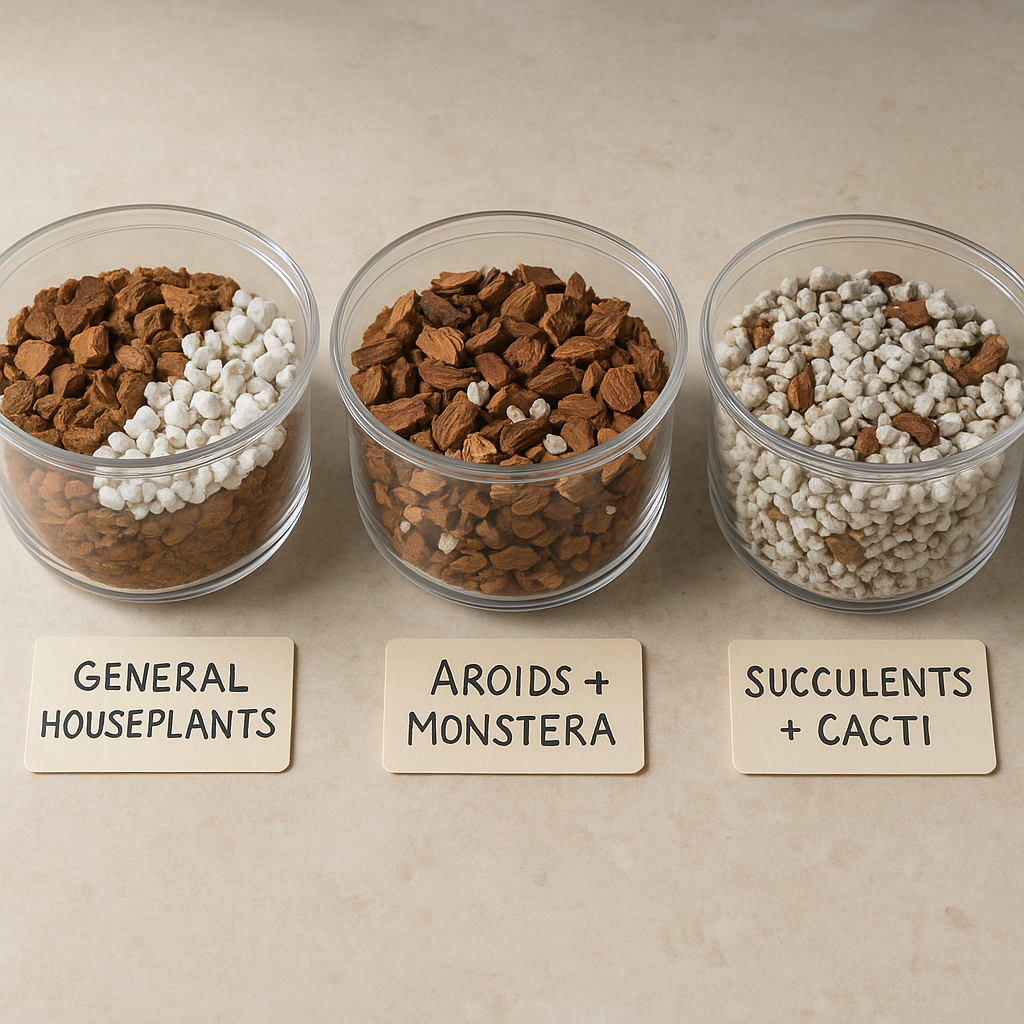
General Houseplants (pothos, philodendron, syngonium, most tropicals):
- 50% coco peat (hydrated)
- 25% orchid bark
- 25% perlite
This is your all-purpose mix. It holds moisture but drains freely, and the bark adds structure. This is what most of your tropical houseplants will thrive in.
Aroids and Monstera:
- 40% coco peat
- 40% orchid bark
- 20% perlite
More bark, less perlite. Aroids want more chunky structure around their roots. This is closer to a true aroid mix — fast-draining, plenty of air in the root zone. See our how to repot your plants guide for applying this in practice.
Succulents, Cacti, and Drought-Tolerant Plants:
- 30% coco peat
- 40% perlite
- 30% orchid bark
Less coir, way more perlite. Succulents want to dry out fast between waterings. This mix drains like a sieve and holds almost nothing — exactly what a desert plant wants.
Moisture-Loving Tropicals (ferns, calathea, maranta):
- 60% coco peat
- 20% orchid bark
- 20% perlite
More coir for consistent moisture retention. Add a layer of sphagnum moss on top for extra surface retention if your ferns are unhappy in ambient humidity.
Common Mistakes and How to Fix Them
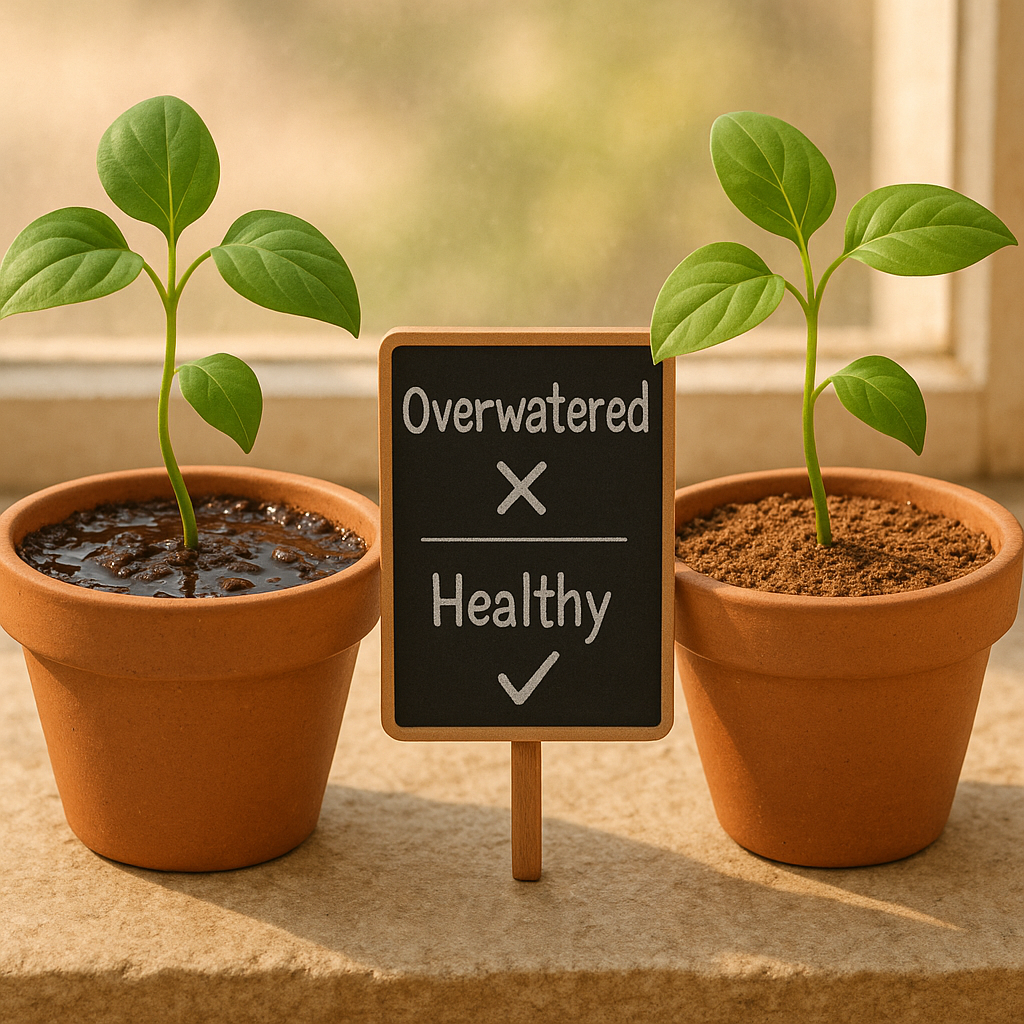
Treating coco coir like regular soil
Coco coir dries differently than peat-based mixes. The top inch might look dry while the root zone is still moist. Use a moisture meter or stick your finger 2 inches deep before watering — don't water based on surface dryness alone.
Skipping the nutrients
Because coco coir is inert, plants in a coir-based mix need more frequent fertilizing than plants in a peat-based mix that has some slow-release organic matter built in. Most houseplant fertilizers work fine — just follow the label and don't underfeed.
Ignoring cal-mag deficiency
This is the one that trips people up most. If your plant looks off and you're growing in coco coir, think cal-mag first. It's an easy fix and a common oversight. See our root rot guide for the overwatering picture — overwatering and cal-mag deficiency look similar (both cause brown tips), so rule out the easy fix before assuming you have root rot.
Using pure coco peat as a sole medium
Pure coir with no amendments compacts over time and holds too much water at the bottom of the pot. Always mix with perlite and/or bark.
FAQ: Everything Houseplant Parents Ask About Coco Coir
Does coco coir have nutrients? No. Coco coir is essentially inert — it holds nutrients when you feed your plant but doesn't provide any of its own. This means your fertilizing routine matters more in a coir-based mix than in a peat-based mix that has some slow-release organic matter.
Is coco coir sustainable? Yes — it's a byproduct of the coconut food industry that would otherwise be wasted. Unlike peat moss, which is strip-mined from slowly regenerating bog ecosystems, coir is harvested from a renewable resource. Most coconut-producing regions (Sri Lanka, India, Philippines, Indonesia) have well-established coir processing industries.
Can I use coco coir alone as a potting medium? You can, but it's not ideal. Pure coco peat holds a lot of water and compacts over time. Mix it with perlite and/or orchid bark for better aeration and drainage. See the recipes above.
How often should I water plants in coco coir? Less often than you think. Coco coir retains moisture well — check 2 inches deep with your finger or a moisture meter before watering. In a well-draining coir mix, most tropicals need watering every 7-10 days depending on your home's humidity and light. In winter, less.
Do I need to buffer coco coir? If you're buying a quality buffered coir product, buffering is already done. If you're using a cheap brick with no buffering instructions, rinse it thoroughly and supplement with cal-mag when you water (see the Cal-Mag section above). Buffering is a pre-use treatment, but cal-mag supplementation is ongoing.
What's the difference between coco peat, coco chips, and coco fiber? Coco peat is the fine, soil-like material — high water retention. Coco chips are chunky crouton-sized pieces — more aeration, less water retention. Coco fiber is long, stringy strands — adds structure and some retention but used mostly in blends. See the visual above.
Bottom Line
Coco coir is the better choice over peat for almost every reason: sustainable sourcing, neutral pH, easy rewetting, and better long-term soil structure. The one real drawback — the cal-mag tie-up — is an easy fix with a $15 supplement bottle and pays dividends in plant health.
If you're repotting anyway, switching to a coir-based mix is one of the easiest quality-of-life upgrades you can give your plants. The mix recipes above aren't rocket science — 50/25/25 is a starting point, adjust based on how your specific plants respond.
One brick, one bag of perlite, one bag of orchid bark. That's the three-component system that will serve most of your houseplants well.
Want to go deeper on the recipe side? Check out our full DIY potting mix recipe guide for the complete picture.
Products We Love
We use these ourselves and think they're worth your attention:
Plantonix Coco Bliss Coco Coir Brick — The entry point. One brick rehydrates into 8-10 quarts of usable coir. Under $10 on Amazon and stores indefinitely dry.
Botanicare Cal-Mag Plus — The supplement you need if you're growing in coco coir. Cal-mag deficiencies are real, common, and an easy fix with this.
Espoma Perlite on Amazon — Standard, clean perlite. The boring but essential ingredient that keeps your coir mix from staying waterlogged.
Orchid Bark on Amazon — Chunkier is better for houseplant mixes. Repotme's bark is consistent in size and clean.
Tupur Coco Mix on Amazon — If you want to skip the buffering step entirely, Tupur is a pre-buffered coco coir blend that comes ready to use. Pricier than a brick, but convenient.