Snake Plant Propagation — The Complete Guide
Three ways to turn one snake plant into ten — without losing your mind.
Why Propagate Your Snake Plant?
Let's be honest: you probably have one of these reasons:
- Free plants. Snake plants produce pups like rabbits. Might as well profit.
- Saving a dying plant. Root rot? Leaf melting? Cut the healthy parts and start over.
- Sharing the love. Your mom, your friend, your office desk — everyone deserves a snake plant.
- Expanding your collection. That $40 variegated snake plant? Now you have four.
The best part? Snake plants are nearly indestructible. They'll root in anything. This isn't rocket science — it's plant parenting at its most forgiving.
The 3 Best Methods for Snake Plant Propagation
Here's the honest breakdown:
| Method | Time to Roots | Difficulty | Keeps Variegation? |
|---|---|---|---|
| Division | 1-2 weeks | Easy | Yes |
| Leaf Cuttings (Soil) | 4-8 weeks | Medium | No |
| Water Propagation | 4-8 weeks | Medium-Hard | No |
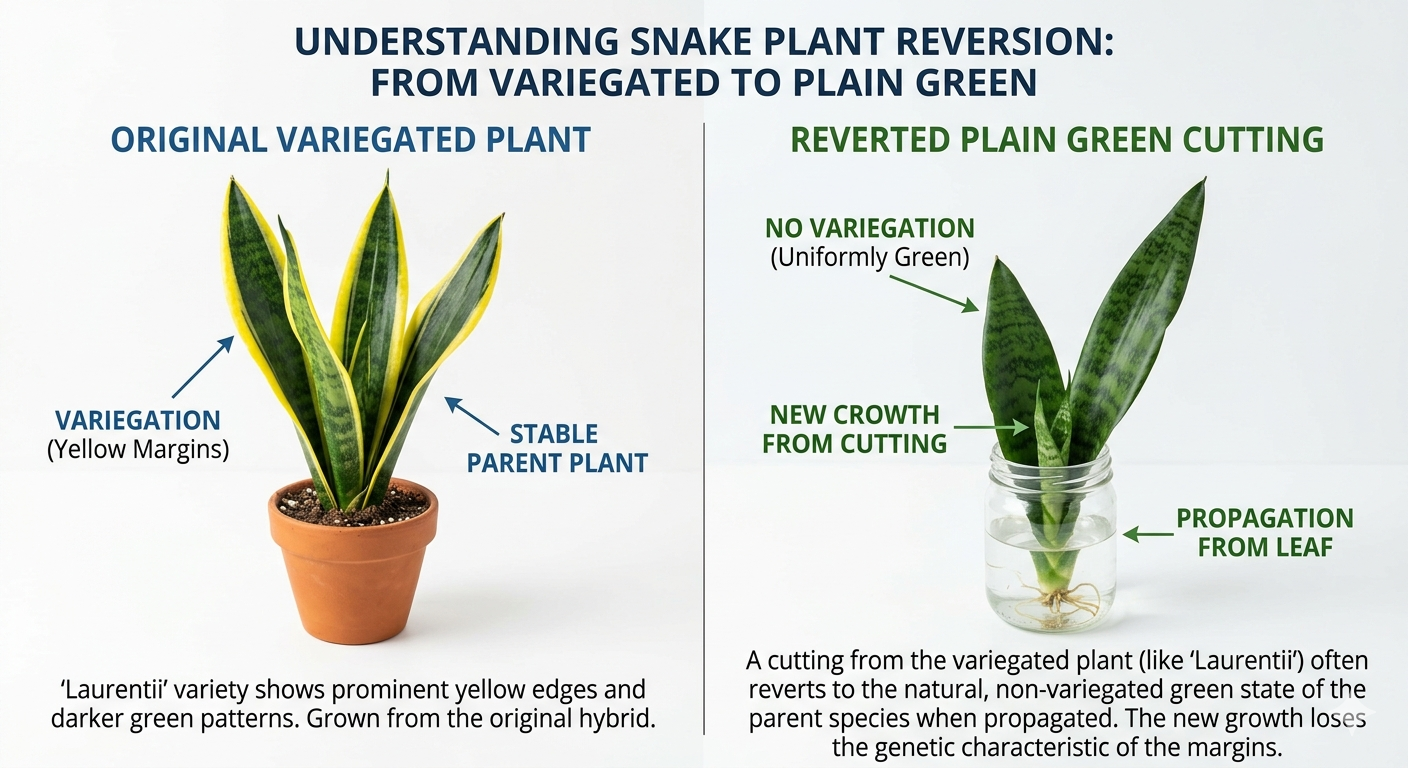
The takeaway: If you have a variegated snake plant (any patterns besides solid green), use division or you're gonna have a bad time. Leaf cuttings from variegated plants always revert to plain green. Always.
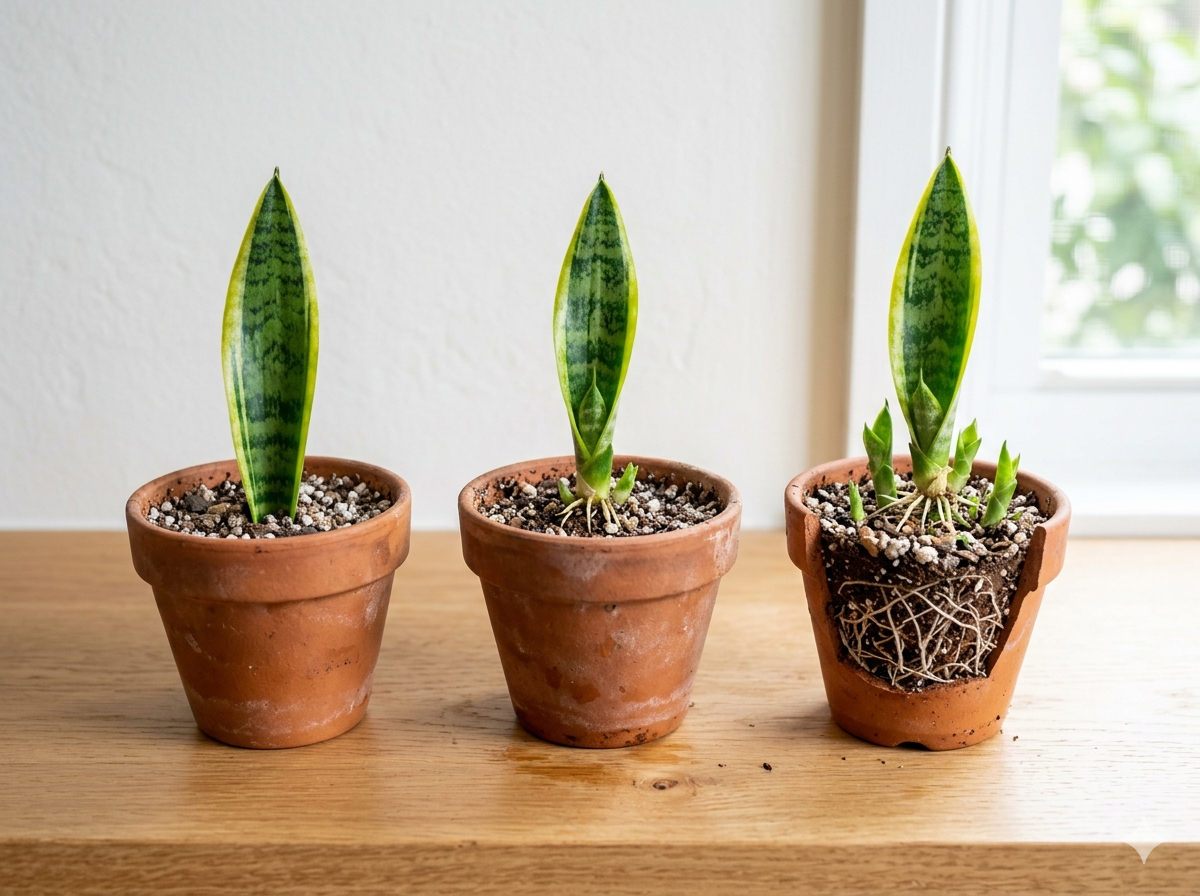
Method 1: Division (Fastest & Best for Variegated)
Division is splitting the plant at the rhizome — basically separating the babies from the mama plant. It's the fastest method, and it's the only way to preserve those pretty variegated patterns.
Step 1: Identify the Pups
Your snake plant should have at least 3-4 leaves on each pup before you separate it. If it's still tiny, wait. The pup needs enough of its own root system to survive.
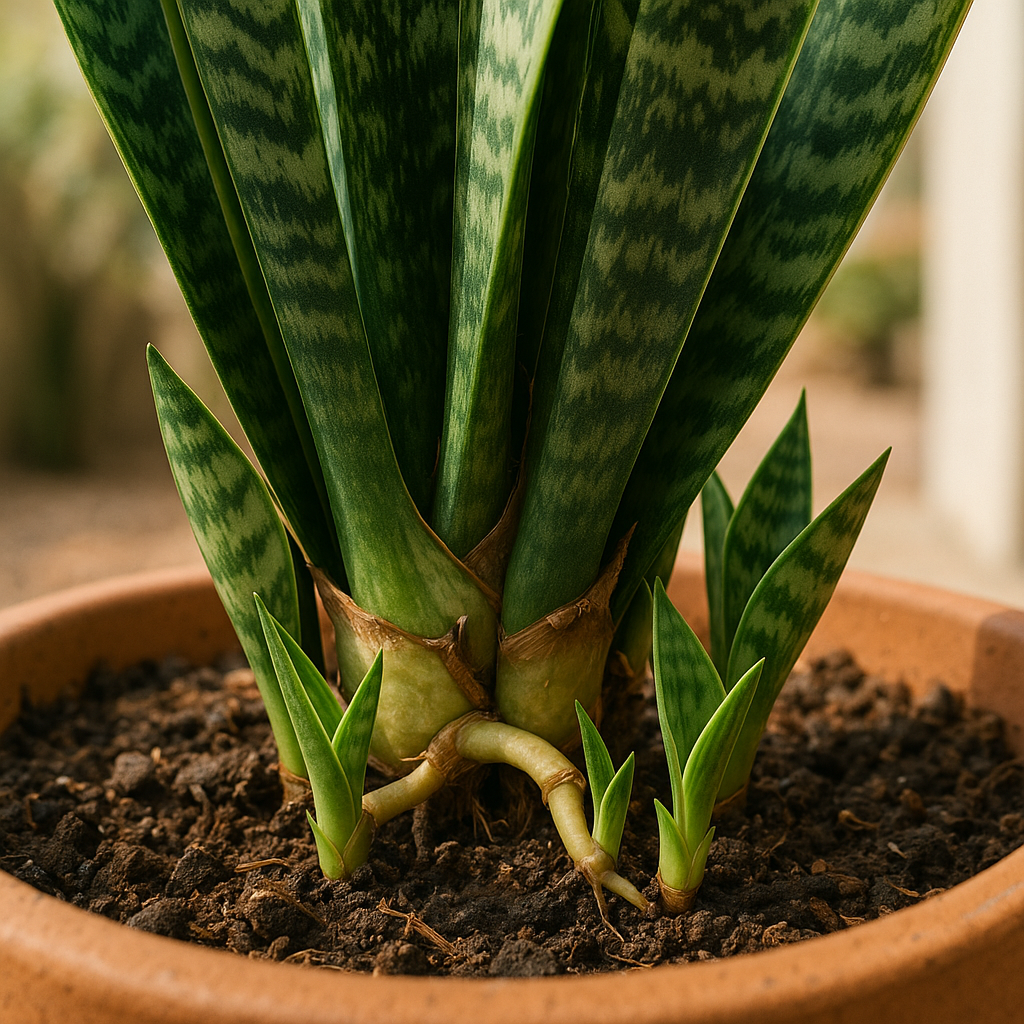
Step 2: Expose the Rhizome
Pull the whole plant out of the pot. Brush off the soil until you can see where the pup connects to the mother plant's rhizome. That thick white stem? That's what you're working with.
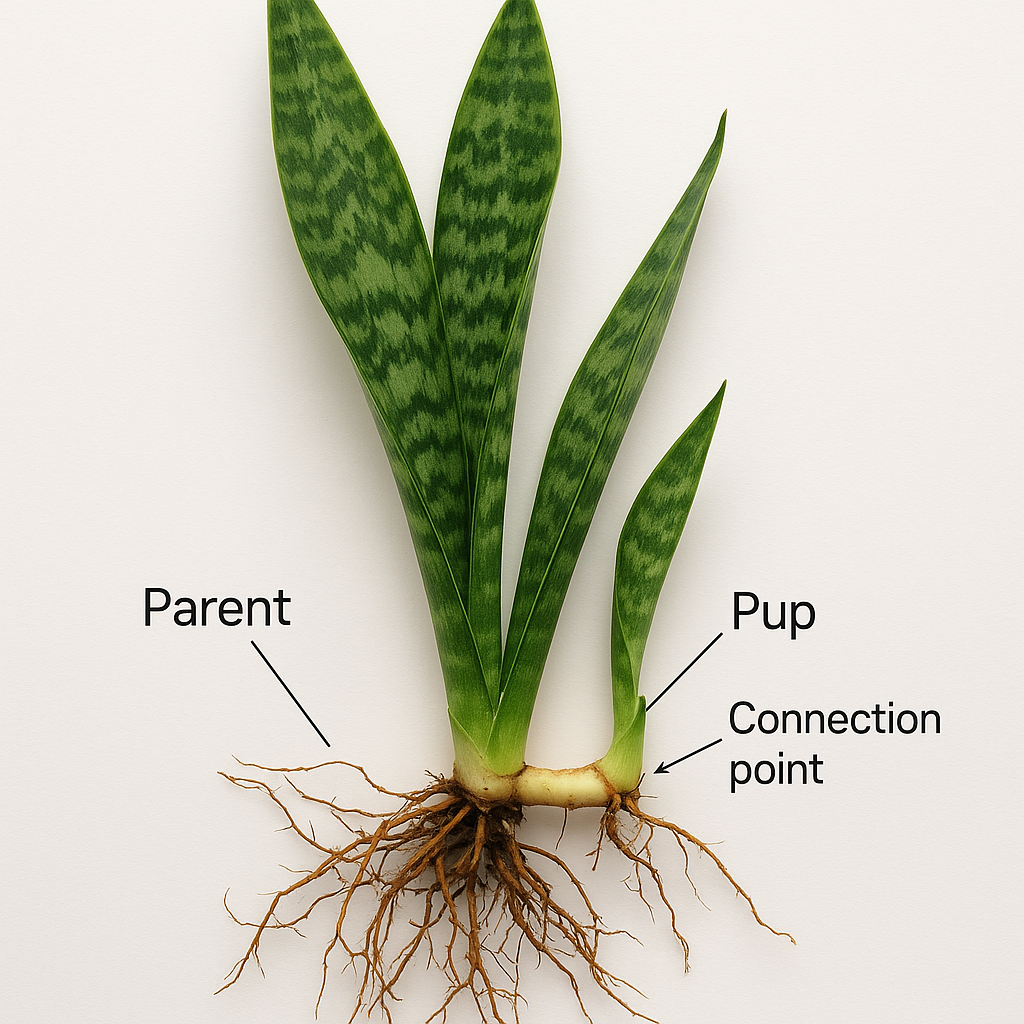
Step 3: Cut Between Mother and Pup
Using a clean, sharp knife or scissors, cut through the rhizome. Make sure each pup has some roots attached — pups without roots will struggle to establish.
Step 4: Pot Each Division Separately
Grab some well-draining soil (more on that in a sec). Pop each division into its own pot, water lightly, and done. Roots usually show up within 1-2 weeks.
Why this method rocks: Fastest results, nearly 100% success rate, preserves variegation. The only downside is you need a mature plant with pups.
Method 2: Leaf Cuttings in Soil
This is the most popular method because it's satisfying and you get a lot of plants from one leaf. The tradeoff? It takes longer and variegated plants will lose their patterns.
How to Cut Leaf Cuttings Correctly
- Pick a healthy leaf. Older, mature leaves work better than new growth.
- Cut the leaf into 3-4 inch sections. IMPORTANT: Mark which end is "up." Snake plant cuttings are directional — plant them upside down and they won't root.
- Let the cuts callous for 24-48 hours. This prevents rot.
- Stick the bottom inch into dry, well-draining soil.
- Wait. Like, a lot.
The Soil Thing
I cannot stress this enough: snake plant cuttings rot easily. They're basically succulent babies. Use a cactus mix or add perlite to regular potting soil (roughly 50/50).
Get the right soil for successful propagation →
Signs Your Cutting Has Rooted
Here's the thing about snake plant cuttings: they don't always show obvious signs. But here's what to watch for:
- New growth — a tiny leaf poking up = success
- Firmness — a rooted cutting feels anchored when you gently tug
- No mush — if it's not turning black or mushy, you're probably fine
This takes 4-8 weeks. Don't give up. Don't overwater. Don't dig it up to "check" (this kills roots).
Boost your propagation success rate →
Why Leaf Cuttings Lose Variegation
If you propagated a beautiful goldenvariegated snake plant via leaf cuttings, the new plant will be plain green. This isn't a failure — it's just how plant genetics work. The variegation happens at the mutation level in the rhizome, and leaf cuttings don't carry that mutation forward.
The fix: If you want to keep variegation, use division. If you have a plain green snake plant, leaf cuttings are fine.
Method 3: Water Propagation
Yes, you can root snake plants in water. It's not the traditional approach, but it works and it's fun to watch.
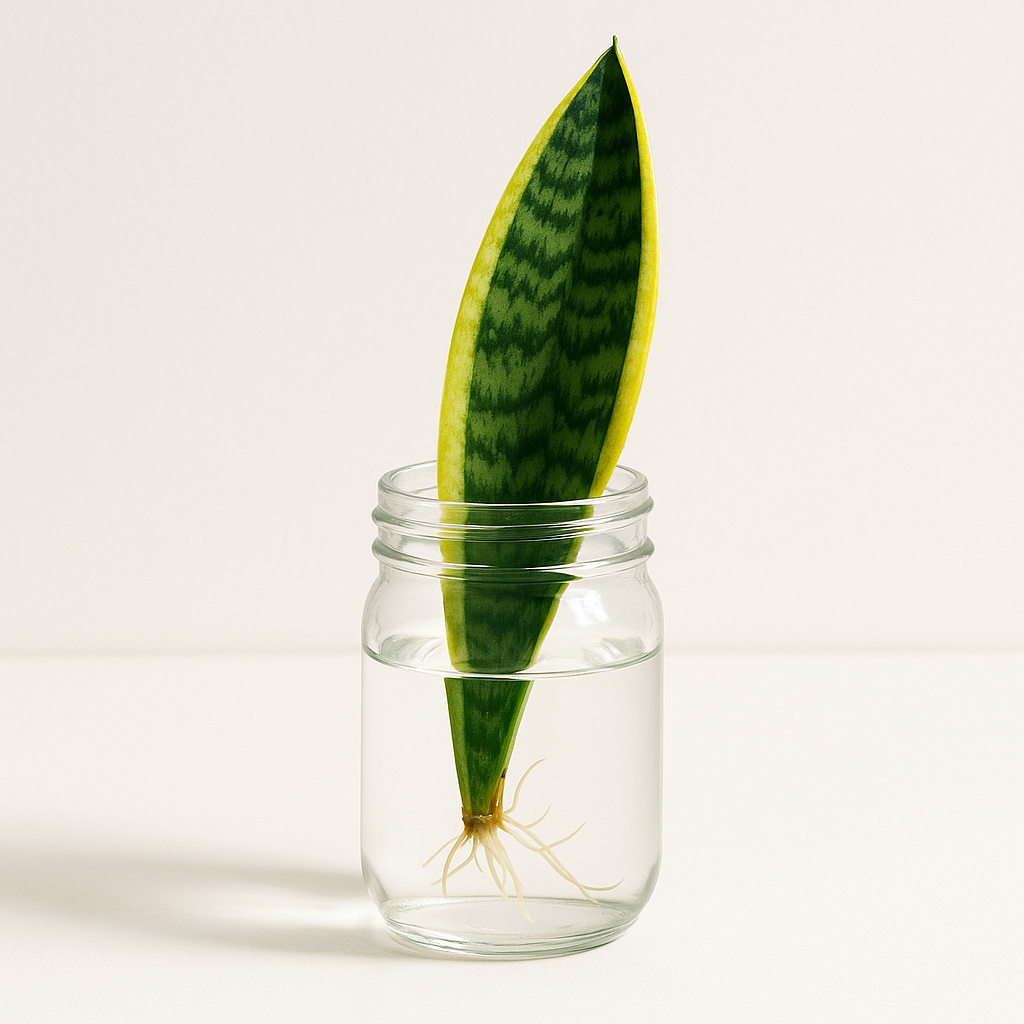
How to Do It
- Cut a healthy leaf into sections (remember: mark the "up" end).
- Put the bottom inch in a jar of water. Just the bottom inch — don't submerge the whole cutting.
- Change the water every week or so to keep it fresh.
- Wait for roots to appear (usually 2-4 weeks).
Water vs Soil: Which Is Faster?
Honestly? They're comparable. Soil might be slightly faster because the plant doesn't have to adjust from water to soil later. But water propagation lets you watch the roots grow, which is genuinely satisfying.
The catch: Water-propagated cuttings are more prone to root rot when you transition them to soil. Go easy on watering for the first few weeks after transplanting.
Week-by-Week Timeline: What to Expect
Most articles give you a vague "several weeks" and leave you wondering if your cutting is dead. Here's the real timeline:
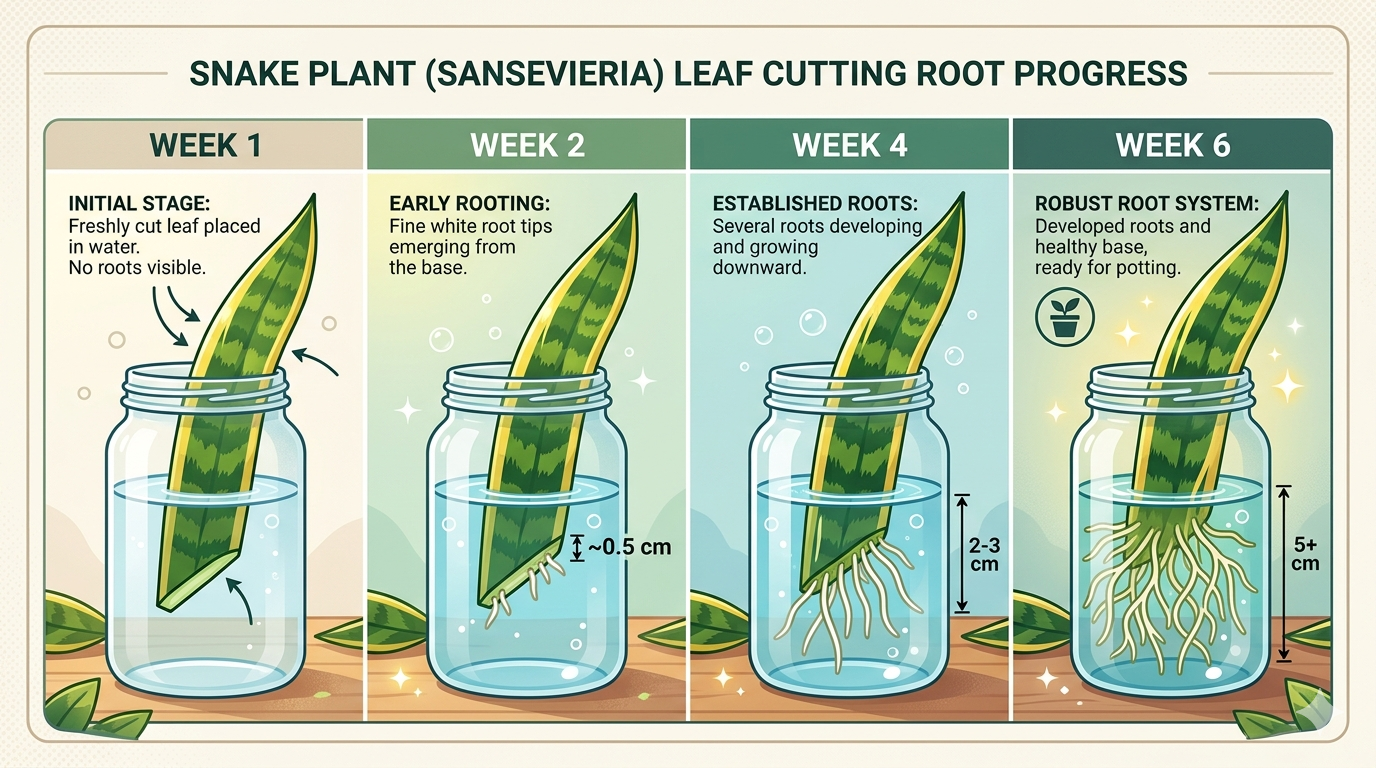
| Week | What Happens |
|---|---|
| 1 | Cut callouses over. Nothing visible yet. |
| 2 | Still nothing. Be patient. |
| 3 | Small bumps (root initials) may appear at the base |
| 4 | Roots start emerging (1/2 to 1 inch) |
| 5-6 | Roots establish. New growth may begin. |
| 6-8 | Cutting is established and growing |
If nothing is happening by week 8: Check for rot (cutting turns mushy/black), check your soil moisture (too wet = rot), or accept that sometimes cuttings just fail. It happens.
Common Mistakes & How to Fix Them
Mistake #1: Overwatering
Snake plant cuttings are prone to rot. If the soil stays wet for more than a few days, you're asking for trouble. Let the soil dry out completely between waterings.
Mistake #2: Planting Upside Down
I know I already said this, but it happens ALL THE TIME. Mark your cutting with a pen or remember: the thick bottom end goes in the soil.
Mistake #3: Checking Too Often
Digging up your cutting to "see if it's rooting" damages the tiny roots that are trying to grow. Leave it alone for at least 4 weeks.
Mistake #4: Expecting Variegation
If your leaf cutting came from a variegated plant and it's turning out plain green, that's not a failure. That's biology.
When to Use Each Method
Use division if:
- You have a mature plant with pups
- You want to preserve variegation
- You want the fastest results (1-2 weeks)
Use leaf cuttings (soil) if:
- You have a plain green snake plant
- You want to produce many plants from one leaf
- You're okay with the 4-8 week timeline
Use water propagation if:
- You want to watch the roots grow
- It's a fun experiment for you
- You don't mind the slightly higher risk of rot when transplanting
Final Thoughts
Snake plant propagation is one of the most forgiving plant projects you can tackle. The worst-case scenario? You lose a leaf. The best-case scenario? You have enough snake plants to line every surface in your home.
Start with division if you can — it's faster and more reliable. Save the leaf cuttings for when you want to experiment.
Go forth and propagate.
Want to know more about keeping your snake plants happy once they're rooted? Check out our watering guide for the full scoop.