Alocasia Dying? 10 Causes & How to Save Your Plant
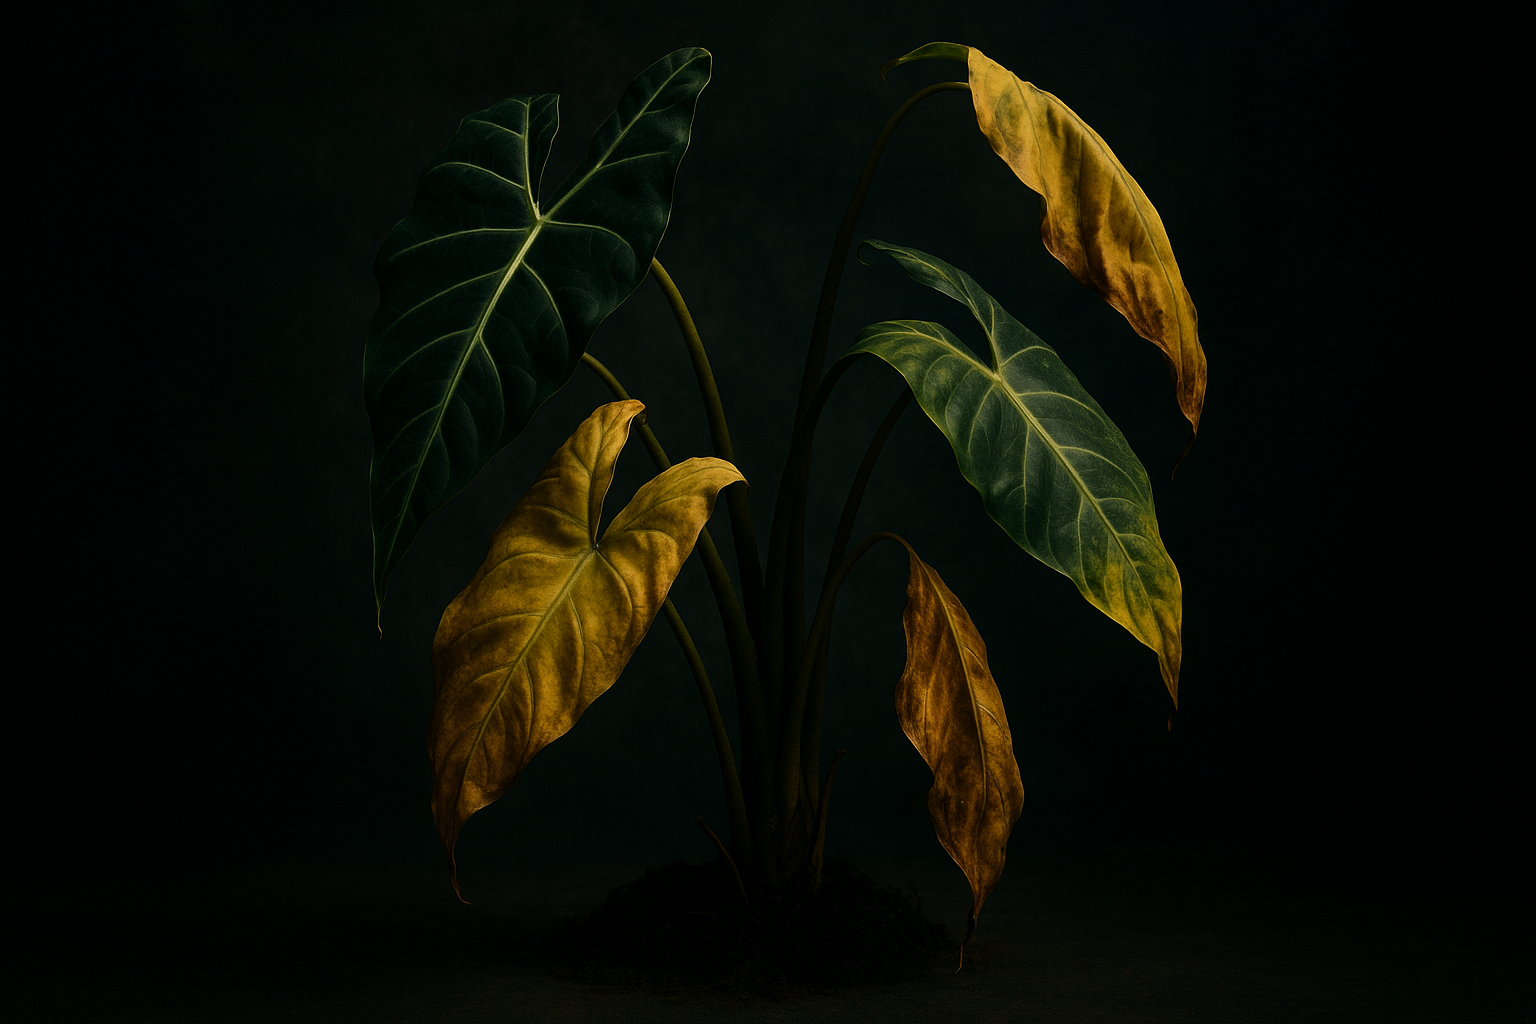
Those gorgeous arrow-shaped leaves drooping, yellowing, or worse? Let's figure out what's wrong.
The Short Version
Your Alocasia is dramatic by nature—it'll let you know instantly when something's off. The good news? These tropical beauties are rescuable. Here's the quick diagnostic:
- Yellow leaves + wet soil → Overwatering / root rot
- Drooping leaves + dry soil → Underwatering
- Brown crispy edges → Low humidity or water quality
- Pale, stretched growth → Not enough light
- Everything dying in winter → Probably dormancy (relax, it's fine)
Why Is My Alocasia Dying? Top Causes Explained
Alocasias are rainforest natives with specific needs that differ dramatically from most common houseplants. When those needs aren't met? Decline happens fast. Here's the full breakdown.
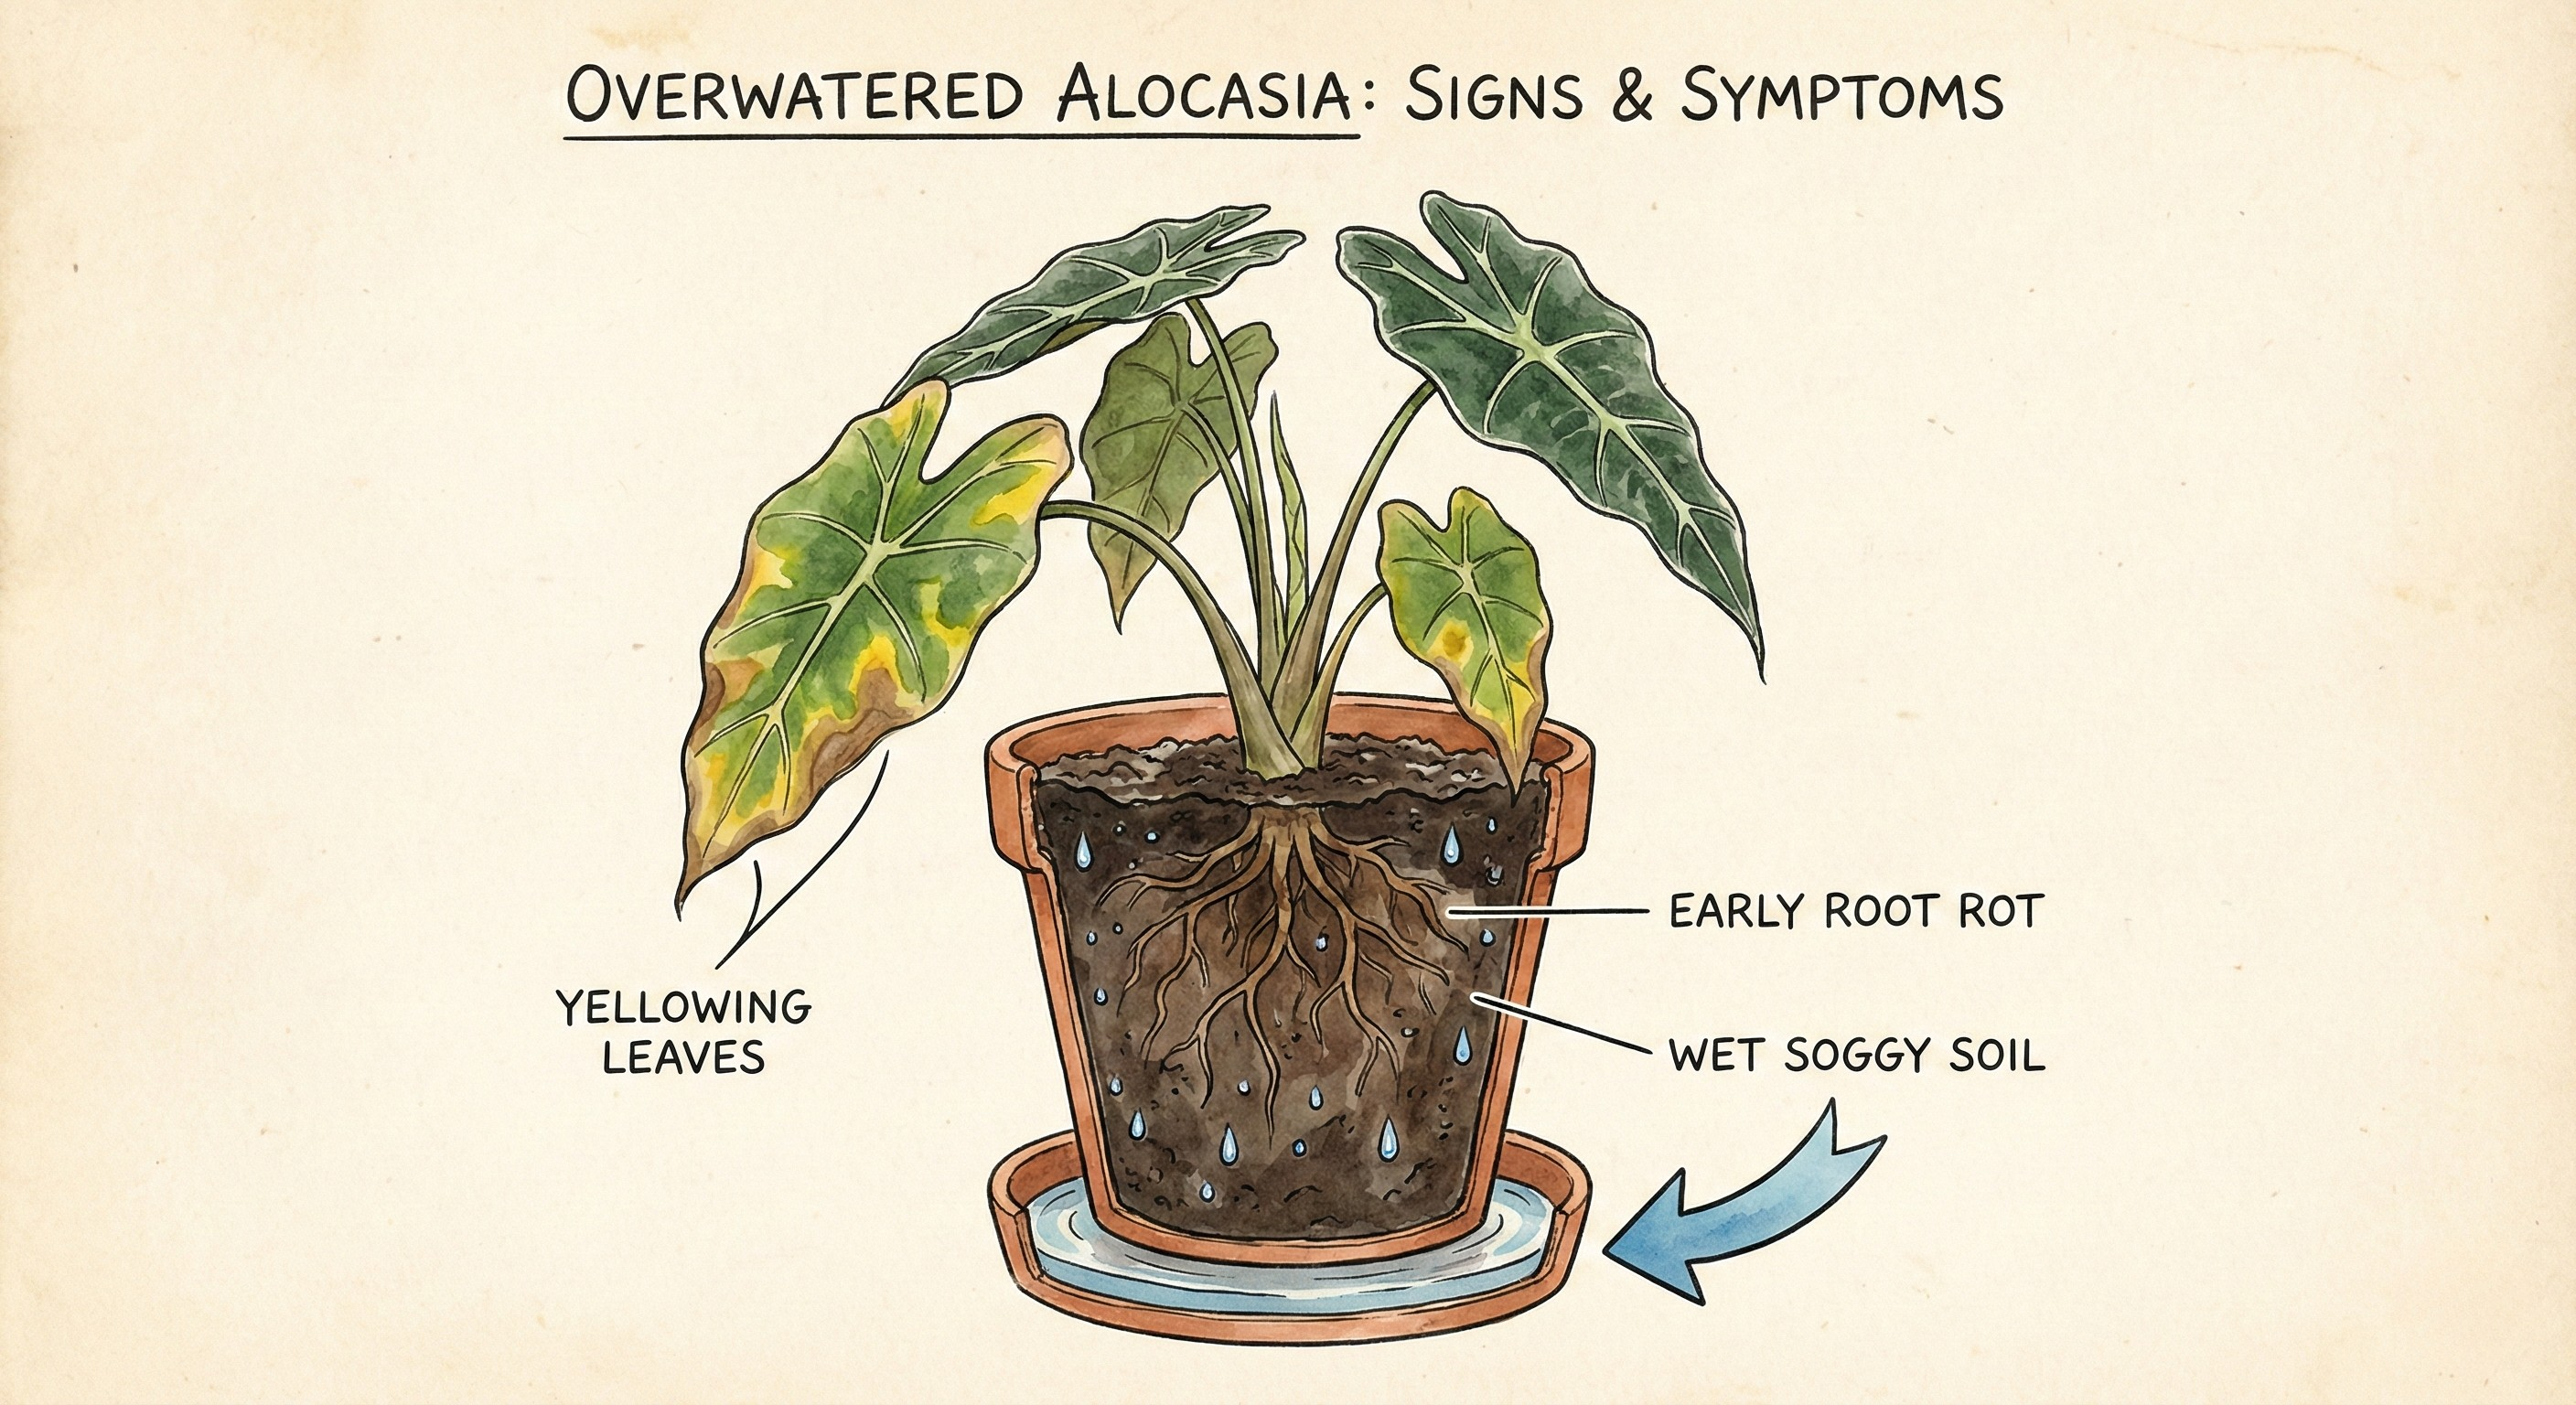
1. Overwatering - The #1 Killer of Alocasias
If your Alocasia is dying, overwatering is the prime suspect in most cases. These plants are semi-aquatic in their native habitat but actually sensitive to sitting in waterlogged soil.
Signs of an overwatered Alocasia:
- Yellow leaves, especially lower/older leaves first
- Soft, mushy stems at the base
- Soil that stays wet for more than a week
- Mold or fungus on the soil surface
- Leaves drooping despite wet soil
The fix: Let the soil dry out more between waterings. Alocasias prefer to dry about 50-75% before the next watering. When you water, water thoroughly and let excess drain completely—never let the pot sit in standing water.
Pro tip: If you're second-guessing your watering, read our how to tell when to water your plants guide.
2. Underwatering - Leaves Drooping and Curling
Just as dangerous as overwatering, underwatering causes an Alocasia to decline rapidly. These plants are thirsty—and they'll let you know.
Signs of an underwatered Alocasia:
- Dramatically drooping leaves (almost lying flat)
- Leaves curling inward or developing crispy edges
- Dry, pulling-away-from-the-pots soil
- Brown, crispy leaf tips and edges
- Slow or stunted growth
The fix: Establish a consistent watering routine. Check soil moisture every 3-5 days (more often in summer). When the top 1-2 inches of soil feel dry, water thoroughly until it drains from the bottom.
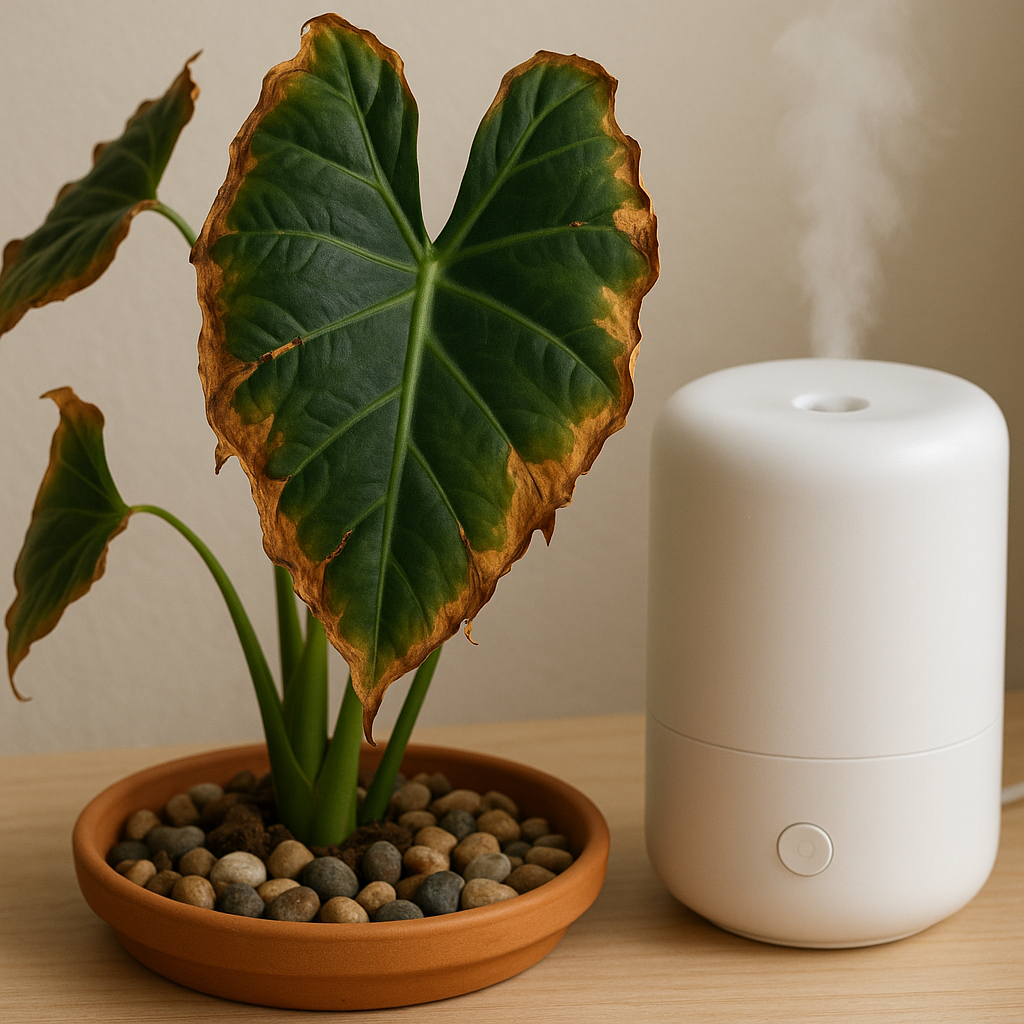
3. Low Humidity - The Tropical Non-Negotiable
Here's where many plant parents struggle: Alocasias need 60-80% humidity minimum—far above the 30-50% found in most homes. This is perhaps the second most common cause of Alocasia problems.
Signs of low humidity stress:
- Brown, crispy leaf edges
- Leaf tips turning brown
- Leaves developing a crispy, dried appearance
- New leaves emerging damaged or smaller than usual
- General decline despite otherwise good care
The fix: Crank up that humidity:
- Use a humidifier near your plant
- Group plants together (they create a microclimate)
- Place on a pebble tray with water (below the pot, not touching it)
- Mist regularly (temporary relief, but better than nothing)
- Consider a terrarium or glass cabinet for severe cases
Need more details? Our humidity guide has everything you need.
🌫️ Give Your Calathea the Humidity It Craves
Want to give your calathea the humidity it craves? Here are our tested humidifiers that keep tropical plants happy:
*As an Amazon Associate, we earn from qualifying purchases.
4. Incorrect Lighting - Too Much or Too Little
Finding the right light balance is crucial for Alocasia health. They need bright, indirect light—mimicking their natural understory habitat in rainforests.
Signs of light problems:
- Too much light: Scorched leaves with brown patches, faded or bleached leaves, crispy spots
- Too little light: Leggy growth (stretching toward light), small new leaves, overall weak growth, leaves drooping
The fix: Place your Alocasia near an east or west-facing window where it gets bright, indirect light. Avoid direct sunlight, which will burn those beautiful leaves. A few feet back from a south-facing window works, or use a sheer curtain to filter intense light.
5. Temperature Stress - Drafts and Fluctuations
Alocasias are temperature-sensitive and dislike drafts, both hot and cold.
Signs of temperature stress:
- Leaves drooping suddenly
- Brown leaf edges or tips
- Leaf drop
- Stunted growth
- General decline after being near a drafty door, vent, or AC unit
The fix: Keep your Alocasia in a stable environment between 65-80°F (18-27°C). Avoid:
- Drafts from doors and windows
- Heating vents and air conditioners
- Cold windows in winter
- Places with temperature fluctuations
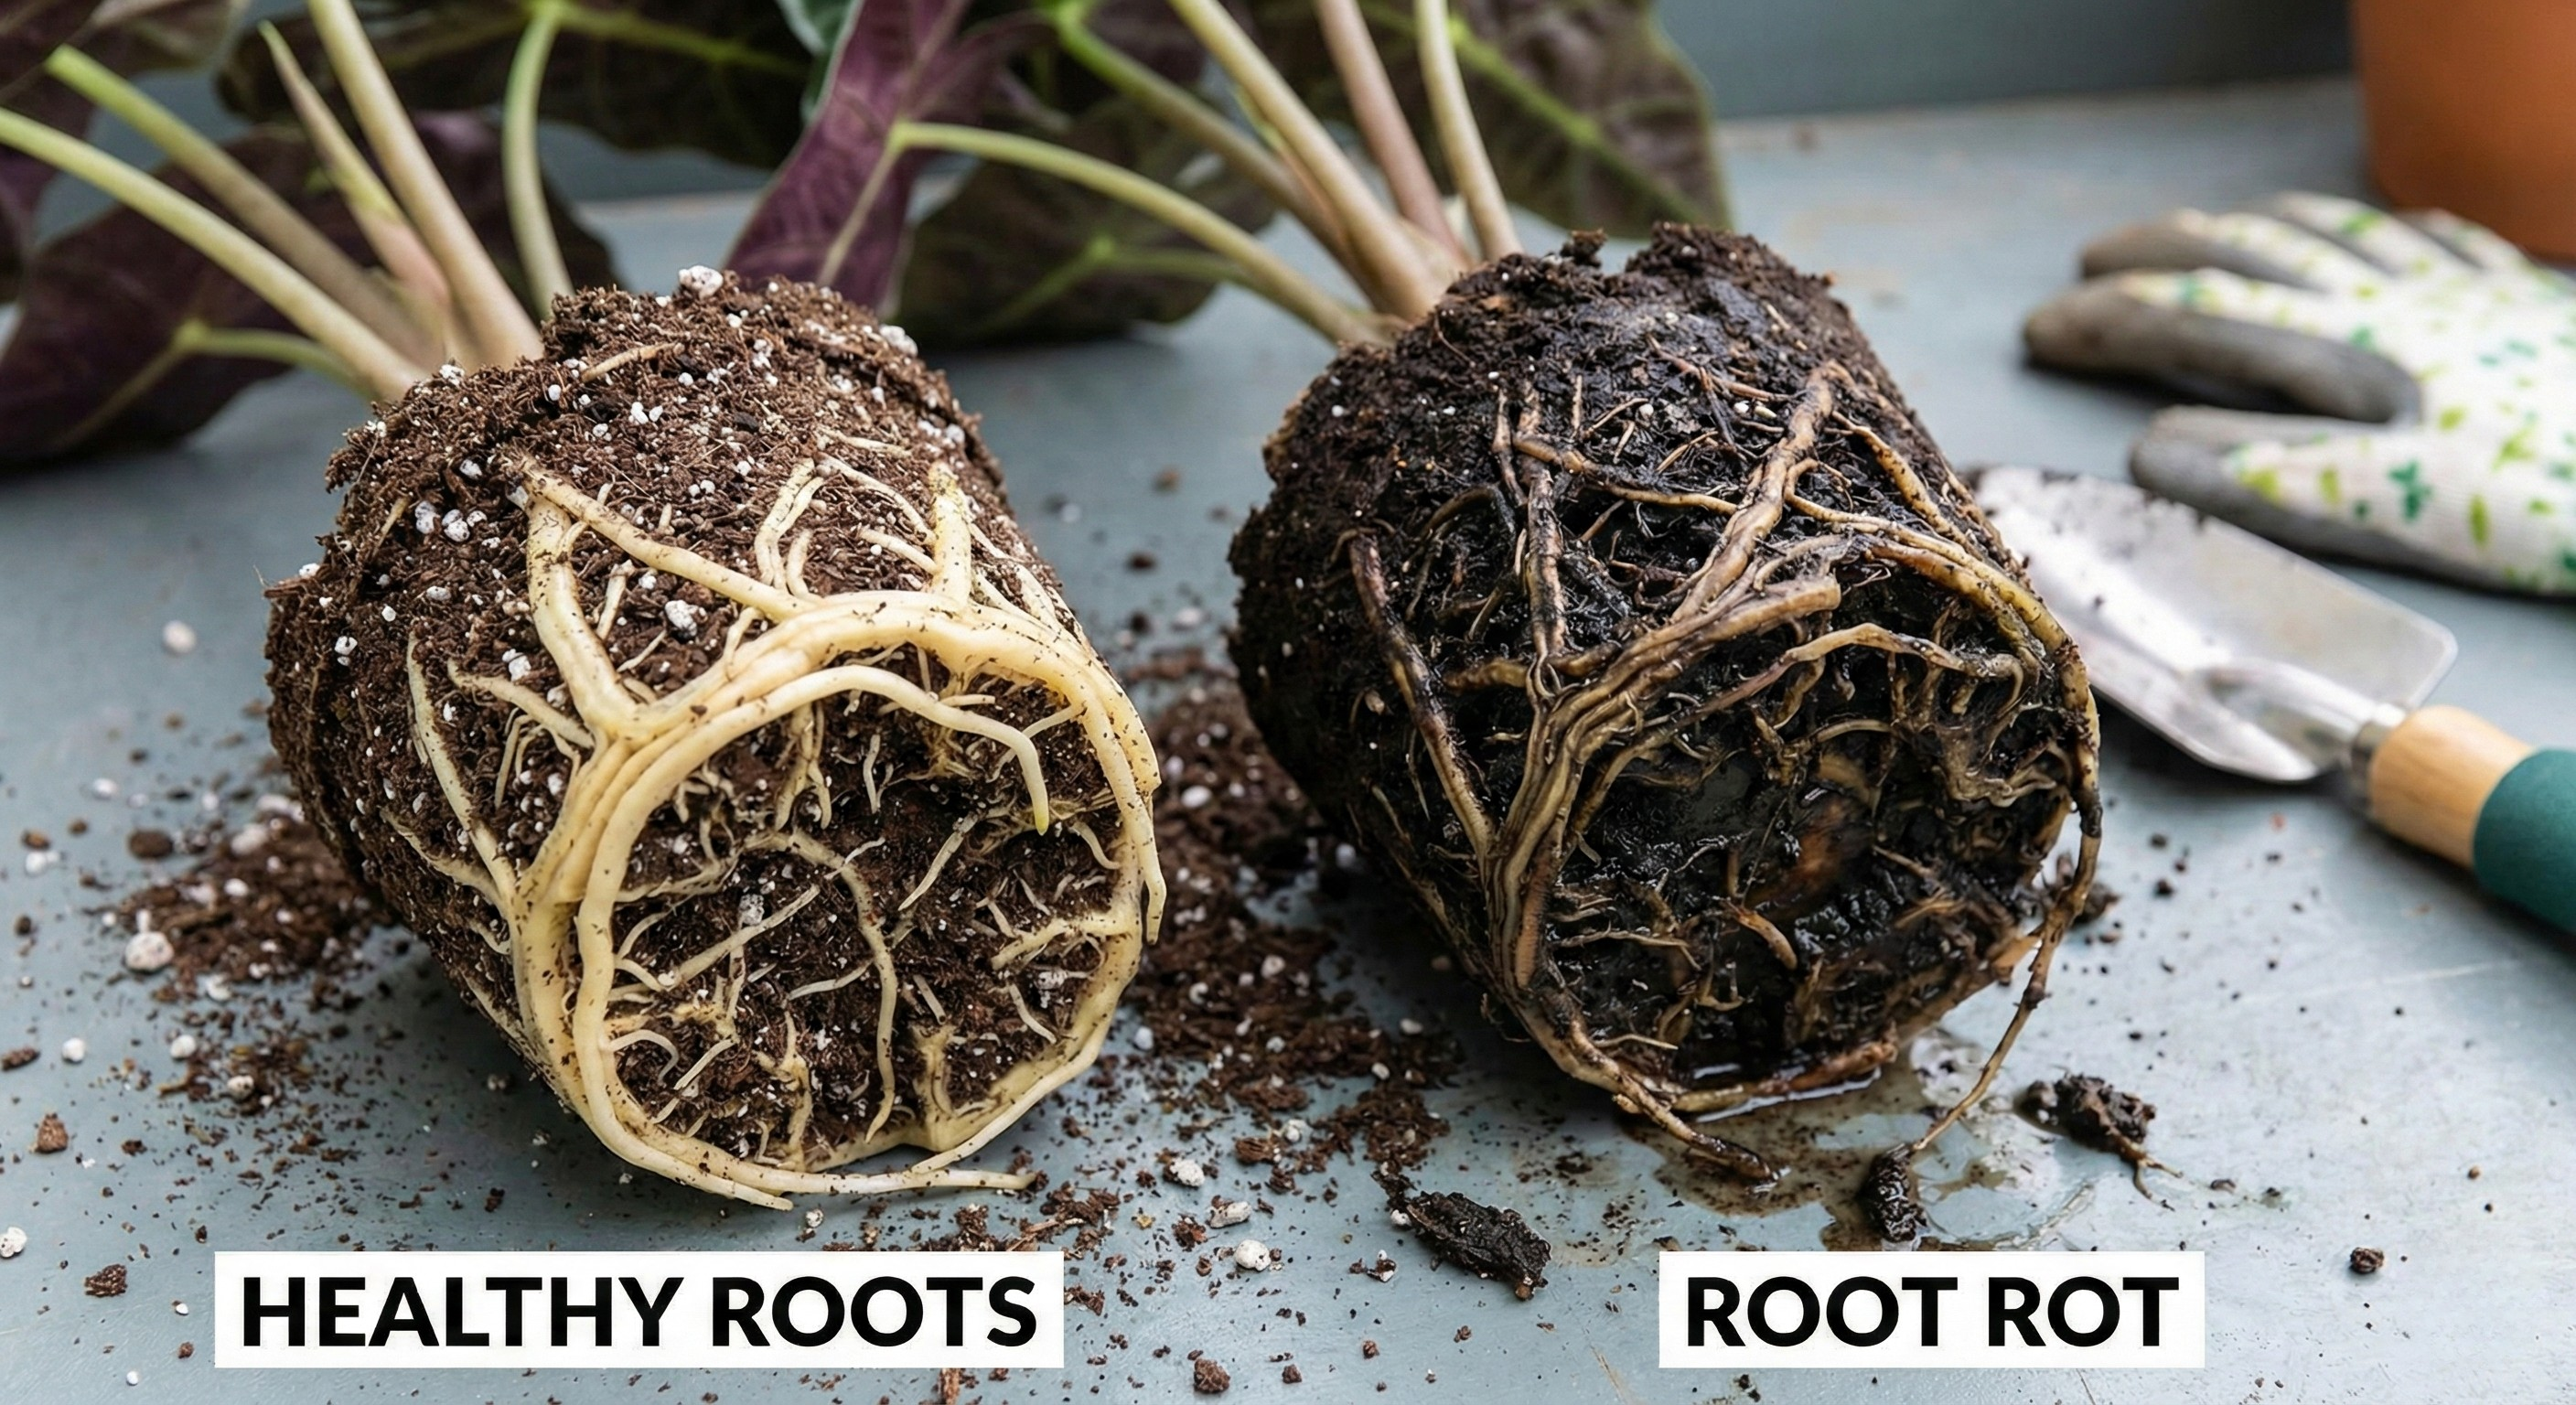
6. Root Rot - Underground Disaster
Root rot is what happens when overwatering goes on too long—roots die and decay, leaving your plant unable to absorb water or nutrients. This can kill an Alocasia quickly if not addressed.
Signs of root rot:
- Persistent wet soil despite watering less
- Yellowing leaves spreading throughout the plant
- Mushy, black, or smelly roots
- Plant feeling loose in the pot (roots have deteriorated)
- Stems becoming soft or mushy at the base
The fix: Act fast!
- Remove the plant from its pot
- Inspect roots—healthy roots are firm and white/off-white
- Trim away all black, mushy, or smelly roots with sterile scissors
- Let the remaining roots dry for an hour or so
- Repot in fresh, well-draining soil in a clean pot (or the same pot after thorough cleaning)
- Water much less frequently going forward
- Consider using a pot with better drainage or a terracotta pot
Need a soil upgrade? Our best pots for plants guide has recommendations.
7. Pest Infestations - Hidden Invaders
Spider mites, mealybugs, and aphids can all attack Alocasias, causing rapid decline.
Signs of pest problems:
- Small bugs visible on leaves or stems
- Webbing (spider mites)
- White, cottony masses (mealybugs)
- Sticky residue on leaves (honeydew)
- Yellowing or stippled leaves
- General weakness and decline
The fix: Isolate the affected plant immediately. Treat with:
- Neem oil spray
- Insecticidal soap
- Rubbing alcohol on a cotton swab (for mealybugs)
- Repeat treatments every 5-7 days for 3-4 weeks to catch hatching eggs
8. Nutrient Deficiency - Yellowing Between Veins
If leaves are yellowing but the veins stay green, your Alocasia may be lacking essential nutrients—typically nitrogen, magnesium, or iron.
The fix: Feed your Alocasia during the growing season (spring and summer) with a balanced, diluted liquid fertilizer (like 10-10-10) every 2-4 weeks. Don't over-fertilize—this causes fertilizer burn, which creates the opposite problem!
Check out our fertilizer guide for more specifics.
9. Water Quality - The Silent Killer
Alocasias are sensitive to the chlorine, fluoride, and minerals in tap water. This is an often-overlooked cause of persistent Alocasia problems.
Signs of water quality issues:
- Brown leaf tips despite good humidity
- Leaf edges turning brown
- General decline without other obvious causes
- No improvement with adjusted care
The fix:
- Use filtered, distilled, or rainwater
- Let tap water sit out overnight before using (helps some, but not all chemicals)
- Consider a whole-house water filter
10. Dormancy - Seasonal Die-Back
Here's one that often scares plant parents: Alocasias naturally go dormant in winter. They may die back to the soil and appear completely dead—but they're just resting!
Signs of dormancy:
- All leaves dying back in fall/winter
- No growth during colder months
- Plant appearing dead (no leaves, no growth)
- History of being healthy in summer
The fix: Don't panic! If the corm (bulb-like root) is firm and healthy, your Alocasia will return. Reduce watering significantly during dormancy, keep in a warm spot, and wait. New growth typically emerges in spring.
How to Save a Dying Alocasia - Step by Step
Ready to play plant doctor? Follow this systematic approach:
Step 1: Assess the Damage
Start by examining your plant closely:
- Are the stems firm or mushy?
- Are there any leaves left, and if so, what condition are they in?
- How does the soil feel—wet, dry, or in between?
Step 2: Check the Roots
This is the most critical step. Gently remove your Alocasia from its pot and examine the root system:
- Healthy roots: Firm, white to off-white, slightly thick
- Root rot: Black, mushy, smelly, easily falling apart
If you find root rot, follow the treatment steps outlined above.
Step 3: Adjust Your Care Routine
Based on your diagnosis, make the necessary changes:
- Water less if overwatered
- Water more consistently if underwatered
- Increase humidity
- Move to better lighting
- Filter your water
Step 4: Create the Ideal Environment
Set your Alocasia up for success:
- Light: Bright, indirect light
- Humidity: 60-80% (use a humidifier)
- Temperature: 65-80°F, stable
- Water: When top 1-2 inches of soil are dry
- Soil: Well-draining potting mix
- Pot: With drainage holes, ideally terracotta
Timeline: When Will My Alocasia Recover?
Recovery depends on the severity of the problem:
- Mild stress (slightly droopy, minor browning): 1-2 weeks with corrected care
- Moderate issues (significant leaf damage, root trimming needed): 2-4 weeks for new growth to appear
- Severe problems (near death, heavy root pruning): 1-3 months for full recovery
- Dormancy: Wait for spring—new growth will emerge when ready
Patience is key. Alocasias are slow to recover but can make remarkable comebacks once healthy again.
Signs Your Alocasia Is Making a Comeback
Here's what to watch for:
- New leaf unfurling—the #1 sign of recovery
- Firm, upright stems that were previously droopy
- Vibrant color returning to leaves
- New growth emerging from the soil
- Sturdy leaf stems that hold leaves up properly
Prevention: Keep Your Alocasia Thriving
The best treatment is prevention:
- Master the watering—let soil dry appropriately between waterings
- Maintain humidity—keep that humidifier running
- Provide proper light—bright and indirect
- Use quality water—filtered or distilled
- Feed appropriately—during growing season only
- Monitor regularly—catch problems early
Frequently Asked Questions
Why is my Alocasia dying even though I water it correctly?
Your plant may be dying from root rot that started before you adjusted watering, or there could be another issue like low humidity, water quality, or pests. Check the roots directly—if they're mushy or black, root rot is the culprit.
Can a completely leafless Alocasia survive?
Yes! If the corm (root bulb) is firm and healthy, the plant can regrow. Remove any mushy parts, repot in fresh soil, reduce watering, and wait for new growth in spring/summer.
Should I cut off dying leaves from my Alocasia?
Yes, remove yellowing or fully dead leaves with clean, sharp scissors. If a leaf is partially damaged but the stem is still firm, leave it—it can still photosynthesize.
How often should I water a struggling Alocasia?
This depends on your conditions, but generally every 7-10 days during recovery. Always check soil moisture first—water only when the top 1-2 inches are dry.
Do Alocasias need special soil?
Yes! Use a well-draining potting mix. Regular potting soil stays too wet. Mix in perlite, orchid bark, or coco coir to improve drainage.
The Bottom Line
Alocasias are dramatic but resilient. With attention to their specific needs and quick action when problems arise, you can bring even a seriously struggling plant back to its full, stunning glory.
These tropical divas demand a bit more attention than your average pothos—but when they're happy? Absolutely worth it.
📊 Track It, Boost It — Complete Humidity Setup
Start with a hygrometer to measure your current humidity, then pair with a humidifier to keep it in the 50-60% zone:
*As an Amazon Associate, we earn from qualifying purchases.
Got a different plant drama? Check out our guides on brown tips, calathea crispy edges, or fungus gnats for more plant-saving tips.